This is all based on a class that my dear friend Hanim Gulenay, OL, and I developed years ago and has gone through several iterations. She is a co-writer on this and a fantastic resource. So, let’s get into it!!
Rectangular construction is a broad term used to describe a simple and efficient method of making garments using geometric shapes. By using rectangles, squares, and triangles you can tailor garments to fit just about anyone in many different cultures and time periods. One advantage of rectangular construction is that it is a very economical use of fabric with little waste. Weaving fabric cost much more, in terms of time, than decorating or sewing seams.
Due to decomposition we have very few complete extant garments. However, archeological evidence spanning from Iron Age Denmark to 16th C. Ottoman gives us insight into using rectangular construction to assemble garments. Each time period and culture has unique decorative elements but the underlying cut and construction is very similar. The information provided here is a framework for you to achieve a better approximation of period clothing appropriate to your culture and time period.
Before we dive into the actual construction though let’s look at our fabric choices. Linen, linen/cotton blends, cotton, wool, and silk are all appropriate fibers (depending on your culture and time period). Avoid polyester, nylon, rayon, and other man-made fibers.
Linen is an amazing and versatile fiber. Made from flax the fibers are about three times longer than cotton and therefore wears better. It is naturally antibacterial, dries quickly, and has heat and moisture wicking properties. Linen is not as expensive as you might think or as difficult to work with and launder. For under garments I suggest 3.5-ounce linen, for over garments, trousers, or coats a 5-ounce, and for fighting garments a 7-ounce. (I usually purchase mine from Gray Line Linen or Fabric-Store.com, both online.) Wash in warm and dry in the dryer before cutting and then wash in cold and hang to dry after it’s a garment.
Cotton was expensive in Europe in our time period and was unlikely to be used alone, rather it was blended with linen and called “fustian”. Unblended cotton was used more in the Middle East.
Wool is found in an amazing array of weights and weaves, from heavy coating to thin diaphanous veils. For tunics and coats, wool is wonderful. For summer weight, I buy worsted or wool flannel and heavier wool for winter tunics and coats. If you think you are allergic to wool or “it’s just too scratchy”, think again. Wash the wool in warm water with baby shampoo and dry in the dryer to felt it and remove all the chemicals used to process it. Wear a linen under tunic to give some buffer and you may find it to not be as itchy as you original thought. As with any fabric, always wash and dry before cutting to avoid the smallest child in the family being the best dressed.
Silk was produced China and arrived in Europe via trade routes (the Silk Road). It was very expensive and rare. It originally arrived with the Norse raiders and traders, but not in large bolts. One reference has a rich Norse king wearing a red silk tunic as an ostentatious display of wealth. Most silk found on clothing in northern European graves is in the form of thin strips used to decorate the chests of tunics and to reinforce seams or bind hems. Byzantines, Arabs, Huns, Khazars and other personas with a better geographical access to silks probably used more in their clothing. Buying silk in small amounts to use in strips or for binding saves money as well as staying in line with period aesthetics. A great source is repurposing garments from thrift stores.
Fur can be used to trim hats, mittens, and coats as well as a great lining for coats. It can be found inexpensively at thrift stores, garage sales and eBay in the form of old coats. Taken apart carefully, a small coat can line about half a “bog” coat. Premade collars and capelets can be repurposed to trim coats.
Let’s get into why we are really here!
The following examples from Carolyn Priest-Dorman show extrapolations of presumed rectangular construction from Birka and Hedeby. (http://www.cs.vassar.edu/~capriest/viktunic.html)

Taking Your Measurements
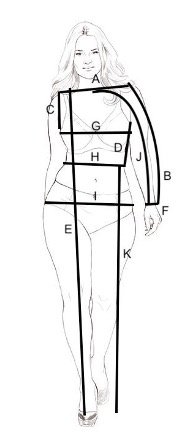
A. Shoulder to shoulder:
B. Shoulder to cuff (arm slightly bent):
C. Armpit up over shoulder to armpit:
D. Armpit to waist:
E. Shoulder to hem:
F. Wrist/hand:
G. Bust or chest at widest point:
H. Waist:
I. Hips:
J. Center neck to cuff:
K. Waist to hem:
I’ve got some measurements, now what?
Now is when we take the measurements you took and draft the tunic pattern. We’ll start by transferring the measurements to the Birka pattern to better see the correlation.

The garment body is as wide as the shoulder to shoulder (A) measurement and as long as the shoulder to hem (E) measurement.
The sleeves are as wide as the armpit up over the shoulder to armpit (C) measurement, and as long as the shoulder to cuff (B) measurement.
For version A, a simple “A line” shape, the side gores are cut on an angle on one side and straight on the other. Compare your chest measurement (G) to twice the shoulder to shoulder measurement (A + A). Subtract the shoulder to shoulder number from the chest number (G – {A + A}). You will want to add a couple inches of “ease” at this point so your tunic won’t be skintight. I usually add 2” for ease but if you prefer it looser you can add even more. Now divide that number by four (you’ll be cutting four gores). This is the width of the panel at the top.

To determine the width of the bottom of the gore, look at the width of the body panel (shoulder to shoulder) and compare this to the width you’d like to see at the bottom hem. Guess, and add the same ease as at the top of the gore. Divide your best estimate by four.
The length of the gore is the armpit to waist (D) measurement plus waist to hem (K) measurement.Viola! Four side panels angled to fit at the chest and flare over the hips.
Viola! Four side panels angled to fit at the chest and flare over the hips.

For version B, a more tailored garment creating a more defined waist, the same technique is used but in two steps.
First, subtract the body number (A+A) from the chest number (G), add ease, and divide by four as above to find the top measurement of the gusset. The gusset length is armpit to waist (D).
Second, do exactly the same but instead of the chest measurement (G) we use the waist measurement (H).

This measurement becomes both the bottom of the top panel and the top of the bottom panel.
The bottom panel length is waist to hem (K).
You have all the measurements you need! Make sure you add your seam allowance. (I use ½” for most garments and 1” for lightweight fabrics or anything I plan to French seam.)
Now you are ready to lay out your fabric, mark your lines and cut/tear your material!
This is an area where people can get tripped up and sometimes it takes marking and remarking your lines to find the best and most economical use of the fabric. If you are using a patterned material it may take some extra work to match the motifs. On the bright side, they didn’t always match their motifs in period so don’t let that hold you back!
A note on cutting, you will never be able to cut as straight as woven fabrics will tear. Start the tear with a clip of the scissors and rip a nice straight line. Of course, if you are cutting a curve or across the bias, then scissors are the way to go. If you find a fabric that just doesn’t tear well, don’t.
If your fabric doesn’t tear easily the next best thing is to draw a thread to create the cutting line. Start in the same manner, with a little clip, then pry out a couple of the threads and gently work them out of the fabric. This will give you a void to cut along. For straight edges on the bias or material that doesn’t tear or draw a thread well, use a yardstick to mark your line.
You will not a dotted line on the diagrams, those are the approximation of where you will need to trim the hem. If you leave the hem straight you will get strange points at the sides.
Construction
- Start by sewing the two body panels at the shoulder
- Cut the neck opening, and for a coat open the front
- Place the neckline 2/3 to the front and 1/3 to the back of the shoulder seam
- For a front wrapped style coat, add wedges of fabric to the front edges to create an overlap
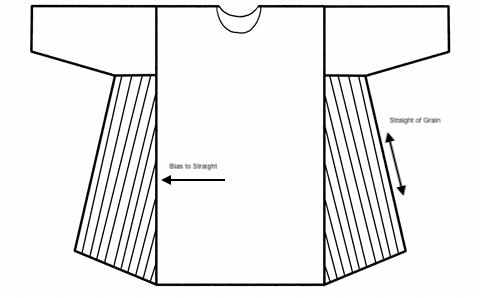
- Sew the side panels to the sleeve
- For version A, keep the bias edge of the gore toward the garment body
- For version B, the lower gore bias goes toward the garment body and the upper gusset bias goes away from the garment body (This allows more freedom of movement for the arm.)
- Sew the side / sleeve assembly to the main body
- This is a good time to pin the sides and check the fit
- Adjustments can be made by adding or subtracting fabric from the body of the garment
- This is the time to shape the sleeves if you want to taper the width down to the hem at the wrist
- Sew the side seams
- Double turn and sew or bind all hems
- Congratulations, you have made a rectangular construction garment!
To alter clothing already constructed this way is very simple.
- Take apart the body to side/sleeve assembly seam
- If more width is needed, insert a strip of similar cloth. (If you use a contrasting color and add embellishment it becomes a design feature.)
- If you need to make it smaller, undo the same seams and remove some fabric
Some extant garments have been found to contain fabrics of different ages as well as fiber. It is apparent that clothing was handed down and newer fabric added in to make it fit successive generations.
Here is a link to a recording of a class I recently taught for the Barony of Lions Gate (Vancouver, BC) https://youtu.be/Icj38x57rlI
Sources
Fransen, Norgaard, Ostergard; “Medieval Garments Reconstructed”
Forest, Maggie; “T-Tunics the Period Way”
Hagg, Inga; “Viking Women’s Dress at Birka: A Reconstruction by Archaeological Methods”
Hagg, Inga; “Textilien und Tracht in Haithabu und Schleswig””
Hald, Margethe; “Ancient Danish Textiles from Bogs and Burials”
Ostergard, Else; “Woven into the Earth – Textiles From Norse Greenland”
Priest-Dorman, Carolyn; “Viking Tunic Construction”
Priest-Dorman, Carolyn; “A Quick and Dirty Look at Viking Women’s Garb in the Ninth and Tenth Centuries”
Natural History Museum of Los Angeles County; “Nomads of Eurasia”
Nurmann, Schulze & Verhulsdonk; “The Vikings”
Scarce, Jennifer; “Women’s Costume of the Near and Middle East”
Scott, Russel; “Female Viking Costume”
Thursfield, Sarah; “The Medieval Tailor’s Assistant, Making Common Garments 1200-1500”
Wayland Barber, Elizabeth; “The Mummies of Urumchi”
Also, a huge thank you to Jasmine Leoni for converting hand line drawings to clean digital diagrams!
